The AI Writing Workflow Pros Use to Save 5-10 Hours/Week
Use this practical AI writing workflow to brief, outline, draft, edit, optimize, and repurpose content faster without publishing generic copy.

The fastest writers I know are not just faster typists.
They waste fewer decisions.
They do not open a blank doc and ask AI to "write a blog post about X." They use a repeatable workflow: brief first, outline second, messy material third, human judgment throughout, and editing in separate passes.
I have become pretty skeptical of "one prompt" writing systems, because they usually save time at the wrong stage. They make drafting faster, then quietly move the work into editing. The better workflow saves time before the draft exists.
That is how AI can realistically save 5 to 10 hours a week without turning your writing into polished filler.
TL;DR: The AI Writing Workflow
Use AI for the parts of writing that are repetitive, slow, or easy to compare. Keep the parts that require judgment, experience, taste, and fact checking.
| Stage | What AI Should Do | What You Should Still Own |
|---|---|---|
| Brief | Turn rough notes into a clear content brief | Reader, angle, promise, proof, CTA |
| Outline | Suggest several possible structures | Final order, missing ideas, section purpose |
| Drafting | Generate hooks, examples, transitions, and rough sections | Point of view, examples, source checks, edits |
| Revision | Shorten, clarify, vary phrasing, find weak spots | Final meaning, tone, accuracy, originality |
| SEO and AI Search | Check coverage, headings, summaries, and internal link opportunities | Helpfulness, evidence, non-generic insights |
| Repurposing | Create email, social, and short-form variants | Channel fit, brand voice, final approval |
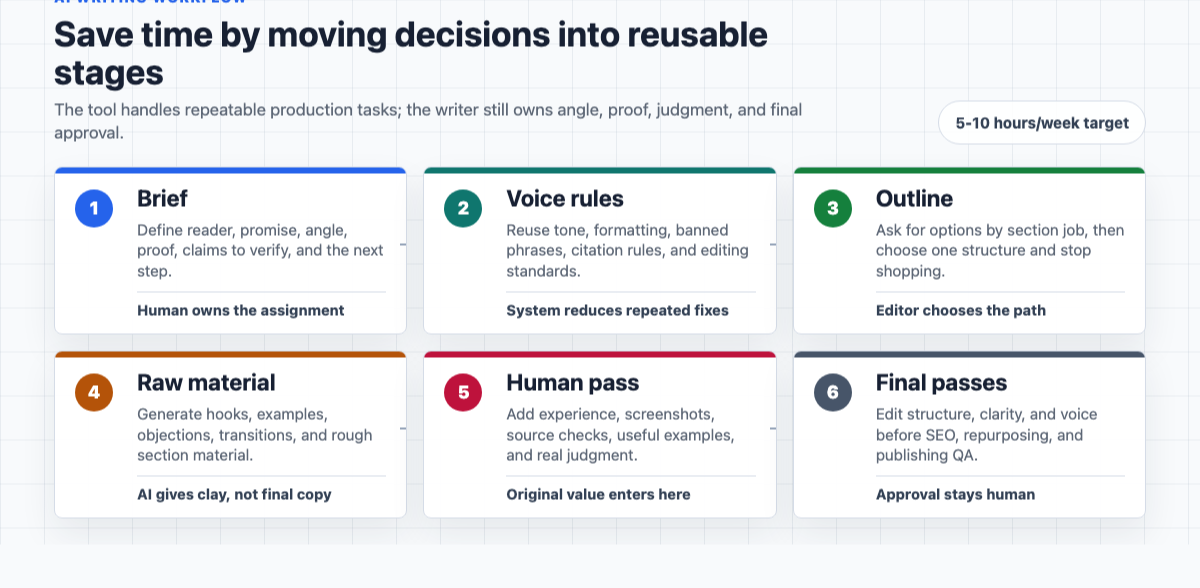
The simple version: decide once, reuse often, and never let the tool publish for you.
Why AI Actually Saves Time In Writing
AI saves time when it reduces switching costs.
Writing is not one task. It is research, angle selection, outlining, drafting, editing, proofing, formatting, SEO, and distribution. Most people lose hours because they keep moving between those modes.
One minute they are trying to write the intro. The next minute they are changing the title. Then they are checking keywords. Then they are rewriting paragraph three. Then they ask AI for a new draft and start the loop again.
That feels productive, but it is mostly restart cost.
A good AI-assisted writing workflow separates the work into stages. You ask the tool for one job at a time, compare the output quickly, and then make the editorial decision yourself.
This matters more now because generative AI is already widely adopted. Stanford's 2026 AI Index reports that generative AI reached 53% population-level adoption within three years, which means "we used AI" is no longer interesting by itself. The differentiator is whether your process produces better, clearer, more useful work than the generic output everyone else can generate.
Start With A 15-Minute Brief
Before you write, make a short brief. Not a 12-page content strategy document. Just enough direction to stop the article from drifting.
When I skip this step, the draft almost always costs me more later. The article may still get written, but I spend the edit trying to discover the point instead of improving it.
Answer these five questions:
- Who is this for? Be specific. "A solo consultant writing one thought-leadership post per week" is better than "business owners."
- What will they be able to do after reading? This is the article's promise.
- What angle makes this worth reading? If the angle is "AI saves time," it is too broad.
- What proof or examples can you use? Experience, screenshots, workflow notes, customer questions, citations, or before-and-after examples.
- What happens after the article? Try a tool, download a checklist, book a call, subscribe, or keep reading.
Then ask AI to turn that into a content brief:
Turn these notes into a one-page writing brief. Include the target reader, search intent, article promise, unique angle, sections to cover, examples to include, claims to verify, and a suggested CTA. Do not draft the article yet.
This is the first time saver. You stop asking AI to guess the assignment.
If search is part of the goal, a SEO content brief generator can help convert the same inputs into expected subtopics, keyword variants, and structural requirements. I would still review it manually, because the best brief is not the one with the most keywords. It is the one that makes the article easier to write.
Build A Voice And Rules Doc Once
Most AI writing sounds generic because every session starts cold.
Create a small "Voice + Rules" doc and reuse it. Mine would include:
- Who the writing is for
- Tone: direct, practical, conversational
- Paragraph style: short, clear, not over-polished
- Words to avoid: "revolutionize," "leverage," "unlock," "seamless," "game-changing"
- Editing rules: no fake stats, no unsupported claims, no fluffy conclusions
- Formatting rules: useful headings, simple bullets, examples when a point gets abstract
Here is a reusable version:
Write in simple, practical English. Use short paragraphs and natural transitions. Avoid hype, corporate filler, fake certainty, and generic AI phrasing. Give concrete examples. If a claim needs evidence, flag it instead of inventing a source. Preserve the main point, but make the writing sharper and easier to scan.
This single document cuts revision time because you are not fixing the same tone problems every time. It also helps if several people on a team use the same workflow.
For tool-based work, store this in your AI writing assistant so each outline, section draft, rewrite, and social version starts from the same expectations.
Outline By Section Job, Not By Heading
A weak outline is just a table of contents.
A useful outline tells you what each section must accomplish.
Instead of:
- Introduction
- Benefits of AI writing
- How to use AI
- Conclusion
Use:
- Open with the real time-waster: decision fatigue, not typing speed
- Give the workflow in a table for quick scanning
- Explain the brief so readers can start without another tool
- Show how to generate rough material without accepting a full AI draft
- Explain the three editing passes
- Add SEO, AI Search, and repurposing only after the draft is useful
- End with a weekly schedule and checklist
Prompt the outline like this:
Create three outline options for this article. For each section, include the job of the section, the reader question it answers, one example to include, and what not to repeat. Keep headings natural and specific.
Once you choose an outline, stop shopping for more structures. If the structure is 80% right, move on.
An article outline generator is useful when your article has too many possible directions. The trick is to use it for options, not authority. I like using outline tools as a pressure test: if three generated structures all miss the same reader concern, that is usually a sign my brief is too thin. You still choose the path.
Generate Raw Material, Not A Finished Draft
This is the biggest workflow shift.
Do not ask AI for the whole article first.
That usually creates a smooth draft with weak opinions, predictable headings, and examples that sound like they came from a template. It can look finished before it is useful, which is dangerous because it makes bad writing harder to notice.
This is the mistake I see most often: people ask for the finish line before they have collected the material. The result is not terrible enough to reject quickly, but not specific enough to publish. That middle zone is where hours disappear.
Ask for ingredients instead:
| Need | Better AI Request |
|---|---|
| Hook | "Give me five opening angles, each under 80 words, with different levels of directness." |
| Section support | "Give me six concrete examples a solo consultant would recognize." |
| Transitions | "Write three short transitions from the brief section to the outlining section." |
| Counterpoints | "List objections a skeptical reader would raise, and where the article should answer them." |
| Cleanup | "Shorten this section by 20% without removing meaning or adding new claims." |
If you do need a complete first draft, use an AI article writer only after the brief and outline are locked. A full draft is much easier to fix when the assignment is already precise.
The mental model is simple: AI gives you clay. You do the sculpture. Personally, I would rather assemble ten rough but specific pieces than clean up one elegant article that has no real point of view.
Use Voice Notes When The Blank Page Is The Problem
One useful competitor pattern was voice-first writing: speak the messy idea, transcribe it, then ask AI to organize it.
That works because many writers do not have a thinking problem. They have a blank-page problem.
The pattern is easy to recognize: messy ideas, repeated reruns through different tools, and a lot of time lost trying to make the output feel coherent. A reliable workflow gives that raw material a path before the model starts smoothing it.
Try this:
- Record a 5-minute voice memo about the topic.
- Transcribe it.
- Ask AI to group the transcript into themes.
- Turn the themes into an outline.
- Pull your strongest phrases back into the draft.
You can use any transcription setup for this. The important part is not the tool. It is that your raw thinking enters the workflow before the AI starts smoothing everything out.
This also protects your voice. A transcript contains your phrasing, your hesitations, your examples, and your real priorities. I have found that even an awkward voice note usually contains one phrase worth keeping, and that phrase often becomes the line that makes the section feel human. AI can organize that material without replacing it.
Draft In Sections
Once the outline is set, draft section by section.
For each section, give the tool:
- The brief
- The Voice + Rules doc
- The section's job
- Any must-use examples
- Any claims that need verification
- The previous section, if transition matters
Then ask for two versions:
Write this section in two versions. Version A should be direct and tactical. Version B should be more conversational and example-led. Keep both under 250 words. Do not introduce facts that are not in the brief.
This is faster than fixing one big generic draft because you are comparing smaller pieces. You can choose the best hook from one version, the clearer example from another, and your own transition between them.
If the draft stalls halfway through, use a content continuer with the section goal and the next two bullet points. Do not ask it to "continue" blindly. Tell it what the next paragraph must do. My rule is simple: continuation prompts should carry direction, not just momentum.
Add The Human Pass Before The Polish Pass
AI can make rough writing cleaner. It cannot reliably add your lived experience after the fact.
Before polishing, add the parts only you can provide:
- A mistake you made
- A client or team constraint
- A detail from your process
- A stronger opinion than the AI gave you
- A real example, screenshot, or small result
- A line you would actually say out loud
For example, "AI helps writers maintain consistency" is technically fine. It is also forgettable.
This is better:
I used to waste 30 minutes rewriting the first two paragraphs because I was trying to find the article's angle after I had already started drafting. Now I force the angle into the brief before I open the draft.
That kind of detail is why the article exists.
Google's guidance on using generative AI content is also a good reminder here: AI can help with structure and research, but content created at scale without added value can cross into spam. In practice, that means your workflow needs human judgment, original examples, and real usefulness, not just cleaner output.
Edit In Three Separate Passes
Most writers edit too many things at once.
That is slow because your brain keeps switching jobs. Structure, clarity, tone, SEO, and proofreading all compete for attention.
Use three passes instead.
Pass 1: Structure
Ask:
- Does the intro match the article promise?
- Does each section answer a different reader question?
- Are any sections repeating the same idea?
- Is the most useful information too far down?
- Does the article have a clear next step?
This is where you cut, move, and combine. Do not polish sentences yet.
Pass 2: Clarity
Ask:
- Can every paragraph be explained in one sentence?
- Are examples doing real work?
- Are there vague claims that need evidence?
- Are any sentences trying to sound smarter than the idea requires?
- Can a busy reader scan the article and still get the workflow?
This is where tools help. A readability improver can make dense sections easier to scan, especially after you have already fixed the structure.
Use grammar and paraphrasing tools carefully at this stage. They are useful for cleanup, but they can also sand down voice if you accept every suggestion without reading the paragraph again. I accept the fixes that remove friction and reject the ones that make every sentence sound equally polite.
Pass 3: Voice
Now remove the AI finish.
Look for:
- Balanced-but-empty phrases
- Repeated sentence shapes
- Over-explained conclusions
- Corporate words
- Paragraphs that sound useful but say nothing specific
An AI humanizer can help soften stiff passages, but it is not a substitute for having something worth saying. Humanizing weak content just creates warmer weak content.
Add SEO And AI Search After The Article Is Useful
Do the SEO pass after the article works for a reader.
For a workflow article like this, I would check:
- Does the title clearly include the core promise?
- Does the opening answer the query quickly?
- Does the article include a short takeaway section?
- Are steps in a logical order?
- Are tables or checklists available for quick extraction?
- Are claims supported when they need support?
- Are internal links placed where they help the next decision?
This matters for AI Search too. Google's 2026 guide to optimizing for generative AI features says core SEO still matters because AI features in Search are rooted in Google's ranking and quality systems. So the practical move is not to chase a special "AI Search trick." Make the article easy to understand, cite, summarize, and trust.
For AI-assisted articles, I would also add one final review against responsible AI writing guidelines: no invented facts, no copied structure from competitors, no fake expertise, no keyword stuffing, and no unsupported claims. This is where I slow down on purpose. The last five minutes can catch the one claim that would make the whole piece feel careless.
Repurpose Only After The Final Draft
Repurposing too early creates extra work.
Wait until the article is final. I have tried repurposing drafts too early, and it usually creates a pile of almost-right social posts that need to be rewritten after the article changes. Finish the main asset first, then create the smaller assets in one batch:
| Asset | Prompt |
|---|---|
| Newsletter | "Turn this article into a 450-word newsletter with a more personal opening and one practical takeaway." |
| LinkedIn post | "Create three LinkedIn posts from this article. Each should focus on one idea, not summarize everything." |
| "Write three subject lines and a short email promoting this article to writers who want to save time." | |
| Short script | "Turn the workflow into a 60-second video script with a strong opening line." |
| Checklist | "Create a compact checklist from the article without adding new steps." |
For email-specific variants, an AI email generator can get you to a usable first version quickly. I would still rewrite the first line and CTA by hand, because those are where generic AI copy is easiest to spot.
A Weekly AI Writing Schedule
Here is a realistic schedule for publishing one strong article a week.
| Day | Time | Work |
|---|---|---|
| Monday | 30-45 minutes | Brief, angle, proof, outline |
| Tuesday | 60-90 minutes | Generate raw material and draft sections |
| Wednesday | 45-60 minutes | Structural edit and missing examples |
| Thursday | 45 minutes | Clarity, voice, fact checks, SEO pass |
| Friday | 30-45 minutes | Repurpose, format, final proof, publish |
This is where the 5 to 10 hours show up. Not because AI writes everything. Because you stop reopening the same decisions every day.
If you publish more often, build from this schedule into an automated blog content workflow. But do that only after you know your brief, editing rules, internal link standards, and quality checks. My bias is to automate later than feels comfortable. Automation makes a good process faster. It makes a weak process louder.
The Prompt Pack I Would Keep
You do not need 100 prompts.
You need a few prompts that match the workflow.
Brief Prompt
Turn these notes into a practical content brief. Include target reader, search intent, article promise, angle, proof to include, claims to verify, possible internal links, and CTA. Do not draft the article.
Outline Prompt
Create three outline options. For each section, include the section's job, reader question, example to include, and what not to repeat. Keep headings natural.
Section Draft Prompt
Draft this section in two versions using the brief and Voice + Rules doc. Version A should be direct. Version B should be more example-led. Do not add unsupported facts.
Skeptic Review Prompt
Review this draft as a skeptical reader. What feels vague, generic, unsupported, repetitive, or too AI-written? What would you challenge?
Tighten Prompt
Shorten this by 20% while preserving meaning, examples, and voice. Do not add new claims.
Repurposing Prompt
Turn this final article into one newsletter, three social posts, and five short takeaway bullets. Preserve the main point and do not introduce new advice.
For a broader library, keep a small set of reusable prompts and improve the ones you actually use. An AI prompt improver is helpful when a prompt is too vague, but avoid prompt collecting as procrastination. A messy draft with a clear brief beats a perfect prompt folder.
Common Mistakes That Cost Hours
The first mistake is asking AI for a final article before you know the angle. That usually gives you generic structure and a lot of cleanup.
The second mistake is editing while drafting. Drafting and editing require different attention. Separate them.
The third mistake is trusting the first outline. Ask for options, then choose deliberately.
The fourth mistake is using AI to hide weak thinking. If the article has no proof, example, opinion, or useful distinction, cleaner wording will not save it.
The fifth mistake is skipping the final human read. AI can miss wrong context, awkward tone, false confidence, and repeated ideas. I do not trust a draft until I have read it once like a slightly impatient reader. A manual read is still where a lot of quality comes from.
The sixth mistake is publishing AI content that only restates existing advice. Google's AI content guidance does not ban AI assistance, but it does reward the same thing readers reward: helpful, original, people-first work.
If your draft already feels too generic, fix that before polishing. The practical skill is editing AI-generated articles before publishing: checking intent, structure, examples, facts, links, and voice before you spend time on sentence-level polish.
The Whole Workflow In One Checklist
Use this when you want the shortest possible version:
- Write the brief.
- Paste your Voice + Rules doc.
- Generate three outlines.
- Choose one structure.
- Generate section-level material.
- Add your examples and point of view.
- Edit structure first.
- Edit clarity second.
- Edit voice third.
- Verify facts and sources.
- Add internal links where they genuinely help.
- Repurpose after the article is final.
That is the workflow pros use to save hours: not one magic prompt, but a system that keeps AI in the right role.
Start with the brief and the voice doc. If I had to keep only two parts of this workflow, I would keep those. Once they are reusable, the rest of the process gets much lighter.